
When a printer is no longer in use, or if there are issues with the printer software, users may need to remove the printer driver from their system. Understanding how to uninstall printer driver properly ensures that there are no residual files left behind that may cause conflicts in the future. This guide provides a detailed step-by-step approach to completely removing a printer driver from Windows and macOS.
Why Uninstall or remove the Printer Driver?
Before proceeding with how to uninstall printer driver, it is essential to understand why one might need to remove it. Below are some common reasons:
- Printer Replacement – Upgrading to a new printer requires removing old printer drivers.
- Driver Conflicts – If multiple printer drivers exist, they may interfere with each other.
- Corrupt Printer Driver – Corrupt or outdated drivers can lead to printing errors.
- Freeing Up System Resources – Unnecessary drivers take up space and resources.
- Reinstallation of the Same Printer – Sometimes, a fresh driver installation resolves printing issues.
If you’re looking to install a printer driver instead, check out our guide: How to Install Printer Driver | Step-by-Step Guide (2025).
How to Uninstall Or Remove Printer Driver in Windows
Method 1: Using Device Manager
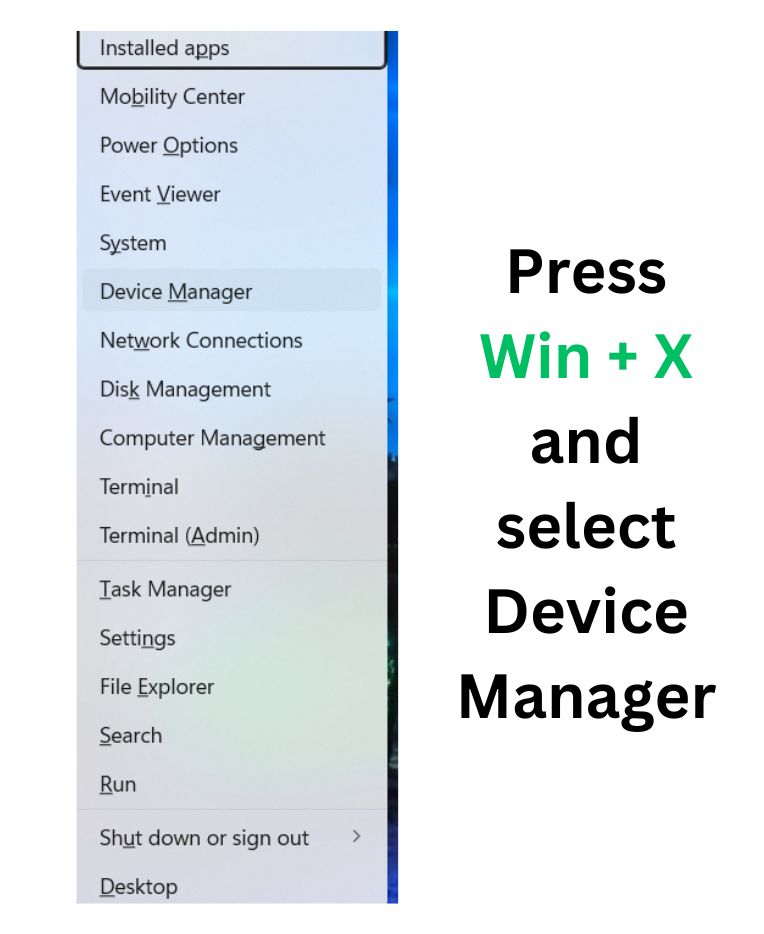
- Press Win + X and select Device Manager.
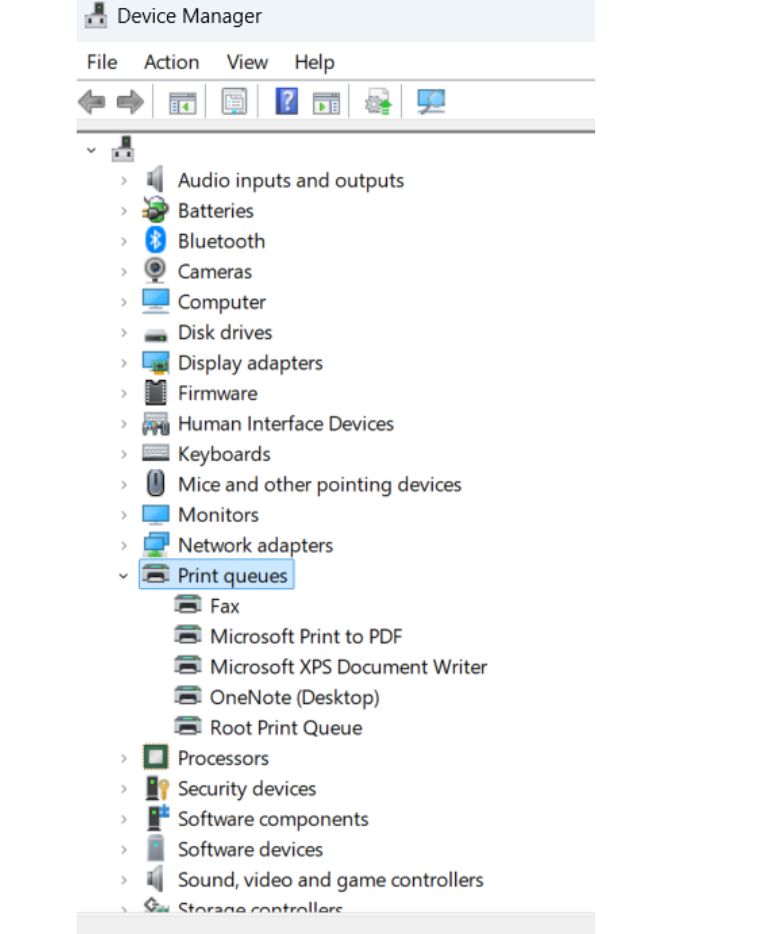
- Expand Printers or Print queues.
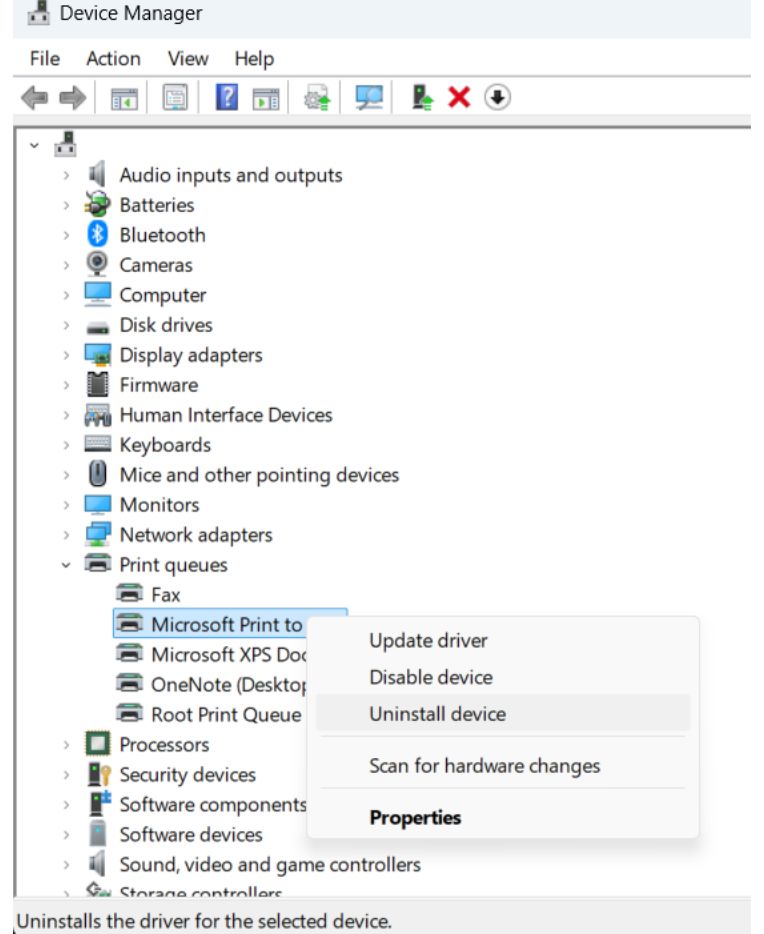
- Right-click on the printer whose driver you want to uninstall.
- Click Uninstall device.
- Check Delete the driver software for this device (if available).
- Click Uninstall to remove the driver.
- Restart your computer to apply changes.
Method 2: Using Control Panel
- Press Win + R, type control, and hit Enter.
- Click Devices and Printers under Hardware and Sound.
- Right-click on the printer and select Remove device.
- Confirm the action and wait for Windows to remove it.
Method 3: Using Print Management
- Press Win + R, type printmanagement.msc, and hit Enter.
- Navigate to All Printers and locate the printer.
- Right-click and select Delete.
- Go to All Drivers, right-click on the driver, and choose Remove Driver Package.
- Restart the computer.
Method 4: Using Command Prompt
- Open Command Prompt (Admin) by searching cmd, right-clicking, and selecting Run as administrator.
- Type the following command and press Enter:
printui.exe /s /t2 - Under the Drivers tab, select the printer driver.
- Click Remove and choose Remove driver and driver package.
- Restart your system.
Method 5: Using PowerShell
- Open PowerShell (Admin).
- Type the command:
Remove-PrinterDriver -Name "Printer_Name" - Press Enter to uninstall the printer driver.
- Restart your computer.
How to Uninstall Or Remove Printer Driver in macOS
- Click on the Apple menu and go to System Settings.
- Select Printers & Scanners.
- Choose the printer and click the minus (-) button.
- Open Finder, go to Go > Go to Folder, and enter:
/Library/Printers/ - Locate the printer folder and move it to Trash.
- Empty the Trash and restart your Mac.
How to Ensure Complete Removal of Printer Driver
- Delete Registry Entries (Windows):
- Press Win + R, type regedit, and hit Enter.
- Navigate to:
HKEY_LOCAL_MACHINE\SYSTEM\CurrentControlSet\Control\Print\Environments\ - Delete printer-related keys.
- Clear Temporary Files:
- Press Win + R, type %temp%, and hit Enter.
- Delete all temporary files.
- Remove Printer Software:
- Open Control Panel > Programs and Features.
- Uninstall any software related to the printer.
Common Issues When Uninstalling Or Remove Printer Drivers
- Printer Still Appears After Uninstallation
- Restart the computer and try again.
- Use Print Management to force deletion.
- Unable to Remove Driver Due to Dependencies
- Stop the Print Spooler service using:
net stop spooler - Try uninstalling the driver again.
- Stop the Print Spooler service using:
- Error Messages When Deleting Printer Driver
- Run Windows Troubleshooter.
- Boot into Safe Mode and delete the driver.
Also you can check out uninstall old printer drivers – Post by Microsoft Community
Fix Printer Driver Is Unavailable for Windows
Fixing a printer driver error depends on the specific issue you’re facing. Below, we’ll explore solutions for both Windows 10 and Windows 11.
- Open Device Manager
- Press
Win + Xand select Device Manager. - Locate your printer under Printers or Other Devices.
- Press
- Uninstall and Reinstall the Printer Driver
- Right-click the printer and select Uninstall device.
- Restart your PC and let Windows reinstall the driver automatically.
3. Update Printer Driver via Windows Update
- Go to Settings > Update & Security > Windows Update.
- Click Check for updates and install any available updates.
Frequently Asked Questions (FAQs)
Q: How do I remove a printer that says the driver is unavailable?
A: Go to Control Panel > Devices and Printers, right-click the printer, select Remove Device, then uninstall the driver from Device Manager.
Q: How to remove the printer driver copy?
A: Open Print Management (print management.msc), go to Print Servers > Drivers, find the duplicate driver, right-click, and select Remove Driver Package.
Final Thoughts on How to Uninstall Or Remove Printer Driver
Understanding how to uninstall printer driver ensures that old, outdated, or corrupt drivers do not interfere with new printers. Whether using Windows or macOS, following these steps guarantees complete removal of a printer driver without leaving any traces behind. Proper uninstallation also enhances system performance and prevents printer-related errors. If issues persist, consider seeking manufacturer support for assistance.
For more helpful guides, updates, and the latest printer drivers, visit our Printer Driver. Stay tuned for new posts and troubleshooting tips!
Read More: How to Install Canon G3010 Printer Driver for Windows
Read More: How to Install Canon PIXMA G2010 Driver for Windows
Read More: How to Install Printer Driver Step-by-Step Guide
Read More: How to Connect Printer to Wi-Fi Router?
")

